Lavender Chiffon Cake 薰衣草戚风蛋糕 ~ This delightful chiffon cake is soft and delicious. It has a unique flora taste of lavender that you'll definitely enjoy with your family for an afternoon tea!
Recipe ~ https://wp.me/p7Ila5-8OL

Search
Lavender Chiffon Cake 薰衣草戚风蛋糕 ~ This delightful chiffon cake is soft and delicious. It has a unique flora taste of lavender that you'll definitely enjoy with your family for an afternoon tea!
Recipe ~ https://wp.me/p7Ila5-8OL
🇬🇧Lemon Cheese Pie from @yellow.butterr - Yummy! Very well balanced throughout. Lemon cream cheese is perfectly tang with light and delicate texture. Overall, I think it’s a simple, yet very homey and classic taste that everyone can easily fall in love with. Only one small thing, I wish the cracker crust could be a bit less crumbly. The rest is already very nice 😻 @sugarcraver
.
.
🇹🇭เลม่อน ชีส พาย จาก @yellow.butterr - อร่อย! รสชาติลงตัวมาก ตัวเลม่อนครีมชีสดีงาม เบา เนียน เปรี้ยวกำลังดี โดยรวมเราว่าเป็นรสชาติง่ายๆเบสิค แต่ก็มีความอบอุ่นโฮมี่ที่ทุกคนจะต้องปลื้มค่า มีนิดเดียวเราว่าถ้าตัวฐานร่วนน้อยกว่านี้หน่อยจะดีมากจ้า นอกนั้นอร่อยอยู่แล้ว 😻 @sugarcraver
.
.
📍: @yellow.butterr .
⭐️: 4.5/5
💰: 1 pound 590 THB
🚗: Delivery only
.
.
.
#sugarcraverX #lemonpie #sweet #sweettooth #dessert #desserts #dessertporn #instadessert #dessertlover #food #foodporn #foodie #foodgasm #foodlover #instafood #delicious #yummy #yumyum #pie #pancakes #icecream #lemontart #cake #cakes #summer #cheesecake #bkkcafe #lemon #tart #tarte

Brown Fox Cafe, The Japanese concept style cafe.
***************** SERVE NO PORK *****************
Coffee | Croissant | Cake | Japanese cuisine
The Strawberry Shortcake taste really good, soft & not too sweet.
🔸 Lotus Biscoff Cheesecake
🔸 Matcha Croissant with Matcha Glaza
🔸 Beef Udon
🔸 Strawberry Croissant
🔸 Hot Matcha
🔸 Hot Cafe Latte
📍 Block B, Lot B-G-06, Sutera Avenue, Lorong Lebuh, Off coastal highway, 88100.
⏳ 9am - 6pm

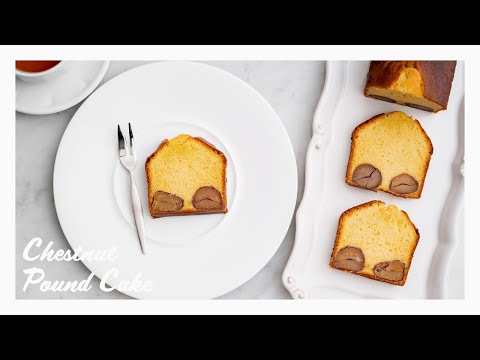
ラム酒香るしっとりほろりな栗の渋皮煮入りパウンドケーキ、栗のテリーヌです
【材料】
18cmパウンド型
・バター 100g
・きび砂糖orグラニュー糖 70g
・はちみつ 15g
・塩 ちょっぴり
・卵黄 2個
・全卵 1個
・薄力粉 60g
・アーモンドパウダー 30g
・ベーキングパウダー 2g
・栗の渋皮煮 8個
・ラム酒 適量
【準備】
・バターを室温で柔らかくする
・パウンド型に敷き紙を敷く
・栗の渋皮煮の表面のシロップをペーパーで拭っておく
・薄力粉、アーモンドパウダー、ベーキングパウダーはふるって使う
・オーブンを170℃に予熱する
【作り方】
1. ボウルに柔らかくしたバター100gをほぐし、泡立て器で砂糖70gをすり混ぜ、はちみつ15g・塩ちょっぴりも混ぜる
2. 卵黄2個を1個ずつ混ぜ、溶いた卵1個分も少しずつ加えて混ぜ合わせる
3. 薄力粉60g・アーモンドパウダー30g・ベーキングパウダー2gをふるい入れ、ヘラに持ちかえてさっくり混ぜ合わせる
4. 粉っぽさがなくなってツヤが出たら半分を敷き紙を敷いたパウンド型に詰め、栗の渋皮煮を並べる
5. 残りの生地を詰めて表面を均し、170℃に予熱したオーブンで40~45分、竹串をさして生地がついてこなくなれば焼き上がり
6. 粗熱が取れたら取り出し、お好みの量のラム酒を刷毛で塗り、ラップに包んで馴染ませて出来上がり
--------------------------------------------------------------------------
【動画でよく使ってる調理器具】
フライパン(20cm):https://amzn.to/2QyY1ny
フライパン(24cm):https://amzn.to/2UtNvz5
フライパン(24cm深型):https://amzn.to/3dj5DEp
鉄フライパン(22cm):https://amzn.to/3a8hqmR
アルミフライパン(24cm):https://amzn.to/3dj6tRz
片手浅型鍋(18cm):https://amzn.to/2QzGXha
片手浅型鍋(21cm):https://amzn.to/2U7ta3o
片手鍋(16cm):https://amzn.to/2QzCj2x
片手鍋(20cm):https://amzn.to/3bd0lZa
ソースパン:https://amzn.to/2U9keuI
まな板:https://amzn.to/2J1fQHI
ガスコンロ:https://amzn.to/3bdtvYa
牛刀:https://www.jikko.jp/fs/jikko/54803
ペティ:https://www.jikko.jp/fs/jikko/54800
撮影機材
カメラボディ:https://amzn.to/2xSXZAd
動画レンズ:https://amzn.to/3t7sfPB
写真レンズ:https://amzn.to/2U7HcCb
録音:https://amzn.to/2U9cGYT
※製品のURLはAmazonアソシエイトのリンクを使用しています
--------------------------------------------------------------------------
▼サブチャンネル(料理実験チャンネル)
https://www.youtube.com/channel/UCqIW0OHh8k2np5ZNz3wz8sg
▼ブログ
http://www.ikashiya.com/
▼Twitter
https://twitter.com/sakihirocl
▼Instagram
https://www.instagram.com/sakiyamahiroshi/
--------------------------------------------------------------------------
↓using translation software.
[Ingredients]
18 cm pound cake mold
・Butter 100 g
・Raw cane sugar or granulated sugar 70 g
・Honey 15 g
・A bit of salt
・Two egg yolks
・One whole egg
・Cake flour 60 g
・Almond powder 30 g
・Baking powder 2g
・Simmered Chestnuts (8)
・Rum, to taste
[Preparation]
・soften butter at room temperature
・Cover the pound cake mold with baking paper.
・Wipe the syrup on the inner skin of the chestnut with a paper towel.
・Sift weak flour, almond powder and baking powder.
・Preheat the oven to 170 °C.
[How to make]
1. Loosen 100 g of softened butter in a bowl, grind and mix 70 g of sugar with a whisk, and mix 15 g of honey and a bit of salt.
2. Mix 2 egg yolks one by one. Add 1 beaten egg little by little and mix.
3. Sift in 60 g of weak flour, 30 g of almond powder and 2 g of baking powder, and lightly mix it together with a spatula.
4. When the powdery feel is gone and the gloss comes out, cover half and stuff it in a pound cake mold covered with paper. Arrange the chestnuts simmered in their inner skins.
5. Stuff the rest of the dough and flatten the surface. Poke it with a bamboo skewer and bake it for 40 to 45 minutes in an oven preheated to 170 °C if the dough doesn't stick then it will be complete.
6. Take it out when it cools down. Brush it with your favorite amount of rum. Wrap it in a plastic wrap and it will be complete.

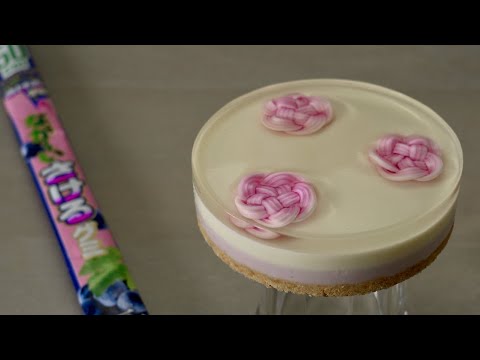
UHA味覚糖「なが〜い さけるグミ 巨峰」をまるまる一本使って、レアチーズケーキをつくりました。
ゼリーに閉じ込めた3つの飾りは水引梅結びにした、さけるグミです。梅結びは、縁起が良いとされ、水引きなどでよく見かける結び方です。梅結びを大量に使って、夏に作っていた娘の工芸作品が かわいかったのに影響され、ケーキにしてみました。
さけるグミのお陰で、思いっきり巨峰味のレアチーズケーキができました。
この手の面白くておいしいお菓子、ほんとにすばらしいな。
*レシピ*(直径 14.5 cmの丸型 1個分)
1.なが〜い さけるグミを4つに割き、梅結びを作る。
ボトムを作ります
2.ビスケット 70gを細かく砕く。
3.溶かした無塩バター 30g(若干崩れやすかったので、35gにしてみてください)を入れ混ぜる。
4.型に敷き込み冷蔵庫で冷やしておく。
レアチーズケーキを作ります
5.水 35gに粉ゼラチン 10gを振り入れておく。
6.室温に戻したクリームチーズ 100gをなめらかになるまで混ぜる。
7.砂糖 60gを入れ混ぜる。
8.無糖ヨーグルト 200gを入れ混ぜる。
9.(5)を600wの電子レンジで20秒ほど加熱し、ゼラチンを溶かす。
10.(8)を混ぜながら(9)を入れる。
11.半量(200g程度)を取り分ける。
12.(1)の梅結びを3つ残し、残りのさけるグミ(22g)を耐熱容器に入れ、水を10g加える。
13.600wの電子レンジで20秒ほど加熱し、さけるグミを溶かす。
14.(11)の半量の片方に(13)を入れ混ぜる。薄紫になるように着色しました。
15.(4)に流し入れ、1時間弱冷蔵庫で冷やし、表面を固める。
16.(15)に(11)の残りの半量を流し入れ、冷蔵庫で冷やし、表面がうっすら固まりかけたら(1)の梅結びを3つのせ、表面を固める。
上部のゼリーを作ります
17.80℃程度のお湯 150gに粉ゼラチン 6gを入れ溶かす。
18.砂糖 30gを入れ溶かす。
19.レモン汁 5gを入れ混ぜる。
20.冷ました(19)を(16)に流し入れる。
21.冷蔵庫で冷やし、しっかり固める。
22.でけた。
むちゃくちゃ巨峰味。そして、さけるグミがフォークで切れるかたさになってて、むちゃくちゃ感謝したわ。
#レアチーズケーキ #水引 #さけるグミ
I made a no-bake cheese cake using a whole UHA Mikakuto "Nagaai sakeru Gummy Kyoho".
The three decorations trapped in the jelly are gummies tied in mizuhiki plum knots.
Plum knots are said to be auspicious and are often seen in mizuhiki. I was inspired by my daughter's cute craftwork that she made during her summer vacation using a lot of plum knots, so I decided to make it into a cake. Thanks to the gummy candies, I made a no-bake cheese cake with a Kyoho flavor. This kind of interesting and tasty snack is really wonderful.
*Recipe* (for 1 round mold 14.5 cm in diameter)
1.Divide the gummy candy into four pieces and make a plum knot.
Make the bottom.
2.Crush 70g of biscuits into small pieces.
3.Mix in 30g of melted unsalted butter (it was a little crumbly, so try 35 grams).
4.Place in a mold and chill in the refrigerator.
Make the rare cheesecake.
5.Sprinkle 10g of powdered gelatin into 35g of water.
6.Mix 100g of cream cheese at room temperature until smooth.
7.Mix in 60g of sugar.
8.Mix in 200g of unsweetened yogurt.
9.Heat (5) in a microwave oven at 600 watts for about 20 seconds to dissolve the gelatin.
10.Add (9) while mixing (8).
11.Set aside half the amount (about 200g).
12.Leave 3 plum knots from (1), put the remaining gummy candies (22g) in a heat-resistant container, and add 10g of water.
13.Heat in a microwave oven at 600W for 20 seconds to melt the gummy.
14.Add (13) to one half of (11) and mix. I colored it so that it would be light purple.
15.Pour into (4), cool in the refrigerator for less than 1 hour, and harden the surface.
16.Pour the other half of (11) into (15), cool in the refrigerator, and when the surface is about to harden, put three plum knots from (1) and harden the surface.
Make the top jelly.
17.Add 6g of powdered gelatin to 150g of hot water at about 80 ° C and dissolve.
18.Dissolve 30g of sugar in it.
19.Mix in 5g of lemon juice.
20.Pour cold (19) into (16)
21.Refrigerate and harden.
22.It's done.
Super Kyoho taste. And I was so grateful that the gummy candies could be cut with a fork.
#cheesecake #longlongman #gummy #mizuhiki

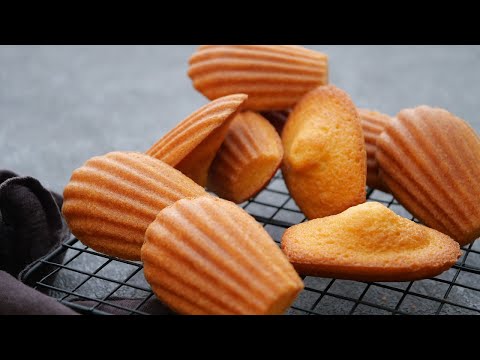
卵、牛乳、砂糖、小麦粉、BP、バター、スーパーで揃えられるこの材料で
お店みたいなしっとりふんわりなマドレーヌが出来ます。
ちゃんと作るとちゃんと美味しい♡
これひとつ覚えておけば、焼き菓子の基本のマドレーヌが
美味しく焼ける人になれるので、お得です^^
知らないよりは知ってる方がいいし、出来ないよりは出来たほうが
楽しいです~♪
楽しいを増やしましょう!
ちなみに焼き菓子は焼き立てよりも翌日の方が絶対に美味しくなりますので
すぐに食べたくなるのをぐっと我慢するのも、
これまた楽しいです、はっはっはっ。
==================================================
大人気YouTuber “cook kafemaru”の
「罪深いスイーツ」
Amazonはこちらから購入できます↓↓↓
https://www.amazon.co.jp//dp/4046048948/
==================================================
「世界一作りやすいおうちスイーツ 」
Amazonで購入できます。↓↓↓
https://www.amazon.co.jp/dp/4046045116/
もしもお住いの近くの本屋さんになかったら、セブンイレブンの
オムニ7でネット予約し、セブンイレブン店頭受け取りで買うことができます!
=============================================
【Ingredients】Makes about 12
1 Egg (60g)
70g Cane sugar(or Granulated sugar)
20g Milk
70g Cake flour
3g Baking powder
70g Unsalted butter
For madeleine pans
Unsalted butter
Bread flour
【Directions】
①Brush the madeleine pans with butter and sprinkle bread flour.
Shake off excess and chill in the fridge.
②Melt butter in a hot water bath and keep warm.
③In a bowl, combine egg and sugar, and whisk together.
④Add the milk and mix.
⑤Add the sifted flour and baking powder and stir.
⑥Add the melted butter and mix.
⑦Cover the bowl with plastic wrap and refrigerate.
Rest the batter for at least one hour.
⑧Preheat the oven to 392 °F/200℃.
⑨Mix lightly until smooth,put the batter into the madeleine pans.
⑩Bake at 356 °F/180℃ for 14minutes.
(do not over bake).
It's done!
After they're cooled, they are still fluffy and moist the next day.
The cake is good when it's freshly baked, but it's even better with the stable taste on the next day.
This madeleine has a "belly button".
It is very fun.
Use Madeleine pan as I think they conduct heat better than silicone molds, but I’ve seen some people make beautiful Madeleines with silicon molds, so it’s up to you.
***れしぴ置き場***
【材料】12個
卵 ( L) 1個
きび砂糖(or グラニュー糖)70g
牛乳 20g
薄力粉 70g
ベーキングパウダー 3g
無塩バター 70g
マドレーヌの型用:
無塩バター
強力粉
【作り方】
①マドレーヌ型にバターを塗り、強力粉をふりかけ
余分な粉を振るい落とし、冷蔵庫で冷やしておく。
②バターを湯煎にかけ溶かし、そのまま温めておく。
③ボウルに卵と砂糖を入れ、泡立て器で混ぜる。
④牛乳を加えて混ぜる。
⑤ふるいにかけた薄力粉とベーキングパウダーを加えて混ぜる。
⑥溶かしたバターを加えて混ぜる。
⑦ボウルをラップで覆い、冷蔵庫で冷やす。
最低でも1時間は寝かせる。
***生地を寝かせることでより美味しく焼き上がります。
⑧オーブンを200℃に予熱する。
⑨冷蔵庫から出した生地は滑らかになるまで軽く混ぜて、絞り袋に入れてからマドレーヌ型に絞り入れる。
生地は型の8分目くらいまで入れる。
***使用する型や、大きさにより変わるので調整してください。
***絞り袋の代わりにビニール袋など使っても。
⑩180℃に設定したオーブンで14分焼いて出来上がり!
***パサつくので焼きすぎないよう気を付けます
焼き立てよりも一晩置いた方が味が落ち着き、しっとりふんわりと
美味しく感じます♪